

There’s a reason why most people will opt for frozen pie crusts or already prepared crusts when making pies. There’s a certain art to making the perfect flaky, golden, and visually appealing crust that few people can master. However, carefully following the recipe instructions (as well as some practice) can result in a homemade pie crust that’s easier than you might think. Here are the secrets you need to know and the science behind the creation of the perfect pie crust that you can make to impress your family, friends, and most importantly, your taste buds.
The Ingredients
You can follow any number of pie crust ingredients, but the formula is consistent: flour + fat + liquid. Many cooks like to take liberties to create unique recipes, but a pie crust recipe is not something you can consider a “guideline,” unless you follow the directions, you can easily end up with something too fragile, too dry, or simply not what you’re looking for. These days, many people try to make substitutions in recipes to lower fat, avoid gluten, or conform to other dietary guidelines. While it is certainly possible to modify pie crusts to work around these needs, there is also a reason why the most successful pie crusts contain these ingredients.
All-Purpose flour or pastry flour: These two flours have the perfect combination of protein and starch. Other flours have too much of either which affects how they absorb the water (how dry or elastic your crust will be) and how much gluten they produce (making the dough too tough). The perfect amount of water absorption and gluten production will result in a flaky and tender crust. This is why replacing flour in pie crust for a gluten-free variety is a little tricky and may require a complicated combination of gluten-free flours to obtain the correct protein balance.
Fat: You may be trying to “be good,” but a pie crust is not the place to skimp in the fat department (try making a crustless pie if you are truly worried about fat content). The fat is what makes the crusty flaky, and while butter results in the most flavorful crust, you can also use hydrogenated shortening (vegetable shortening works just find for all you vegans) or lard. Skimping on the fat will create a more “mealy” crust.
Liquid: Most people use water for the liquid in pie crusts, which works to bind the dough by connecting the proteins in the flour to form the gluten structures necessary. Without liquid, your crust will be too crumbly to properly roll and shape to the pie pan. Some people add a little bit of vinegar to slightly weaken the gluten and make the dough easier to roll.
The Technique
Even if you have all the right ingredients, you have to pay special attention to how you mix them. To begin with, your ingredients should be cold. For most recipes involving butter, they ask that you soften it before mixing, but for pie crusts, the butter should be near freezing, therefore the best form of mixing the butter into the flour is by using your hands. Do this by working quickly (before the butter begins to melt) to mix the butter and flour until it resembles small peas or gravel. Do not over mix. Some people make the process easier by grating frozen butter into the flour with a cheese grater. In fact, it’s best if all the ingredients, including the bowl you are mixing them in, are cold throughout the whole mixing process. The flakiness of your crust depends on it. As the fat melts during the baking process, it creates tiny pockets of air in the crust, which equals a flaky and delicious crust. Mix your (cold) water into the gravely mixture with your hands as well just enough so that you can form a dough ball.
Pay Attention to the Edges
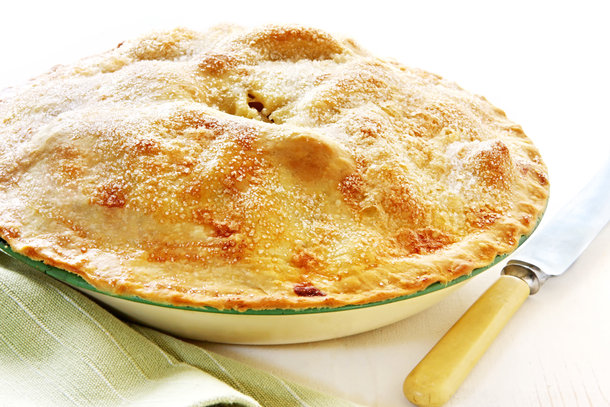
After you have rolled out the dough and placed it in the pie pan, the hard work is behind you. However, even if you have created the most perfectly delicious pie crust, a poor production can undo all your hard work. Trip the edges of the pie crust so that they fit the edges of the pie pan and then spend some time to create an attractive edge by fluting the edges by pinching them around your finger, using a fork to create a simple imprint around the edge, or even using cookie cutter cutouts of various shapes with extra pie dough. If you’re making a fruit pie, consider making a lattice top layer, cutting out shapes with cookie cutters, or cutting careful and even slits for a simple and classic look. A beautiful presentation is just as important as a delicious taste.
Baking the Pie Crust
Pay careful attention to your pie crust throughout the baking process. Often, the edges of the pie crust will be done before the rest of the pie, and you don’t want to ruin your crust by burning the edges. Once the crust edges begin to turn a desired golden brown, cover the edges of the crust with aluminum foil to prevent burning while the rest of the pie cooks.
Additional Pie Crust Tips
- Bake crust at a higher temperature (400 degrees Fahrenheit) for a crispier crust.
- Brush the inside of the pie crust and the top layer of pie crust with a beaten egg to prevent a soggy crust for fruit pies.
- Start fruit-filled pies on a lower baking shelf for the first 15-20 minutes of baking to make sure the bottom of the pie cooks thoroughly before moving it to a higher shelf to allow the top crust to cook to golden.
- Start off by using the minimum amount of water to work into the crust and slowly add more as you need it. You will often need less water than the recipe calls for, but keep in mind that you could need more.
What’s your secret for making the perfect homemade pie crust? Share your tips with us in the comments section below.